
")
How to use a funnelbuilder including sales funnel stages
Okay, so let’s stop assuming that everyone knows everything about using a funnelbuilder!
If you’ve never built a sales funnel before it can be confusing, overwhelming, and downright frustrating – I get that.
However, with a few basics in place and a systematic approach, a solid sales funnel could be just the thing you need to 10x your sales, seriously.
Don’t believe me?
Then just shoot over to this page and check out my funnel ROI calculator – play with the numbers in my calculator and you’ll begin to see the huge difference it can potentially make to your business.
How to use a funnelbuilder the right way

So, let’s approach this logically.
The first thing to do before you get started in earnest with your funnelbuilder is plan out your funnel – get it absolutely clear in your head what you want to build before you get started.
Sure you can (and will) modify the thing as you go along. But make sure you have the basics in place before you tackle the funnelbuilder tech.
Here are my funnelbuilder stages (the basics)
-
- Start with a landing page (also known as a squeeze page).
The purpose of this page is very important. In return for giving something away for free (an eBook, a report, a short video course, a software tool etc.) you capture the visitors’ email address and first name (recommended).
The reason I suggest only capturing the first name and email is you need the email to continue marketing to your prospect, and the less you ask them to reveal about themselves, the less likely they are to abandon the page leaving you empty-handed! - Next, you’ll want a bridge page or sales page
So, now you’ve captured your prospect’s email and first name, next you’ll want to move them along to the next stage, which is…
…well there’s a lot of debate about this, let me explain.
There are 2 schools of thought here:
a) Try to sell your prospect right away (you have their email address, so now they’re a prospect rather than just a visitor).
b) Handle them with kid gloves as you haven’t earned the right to sell them anything yet.
This is tricky, you don’t want to blow your chances straight out the gate.
This is what I suggest.
Either
Sell them a very low-cost, high-value item that’s a no-brainer
Or
Pile on the value even more by taking your prospect to a webinar page where you have the chance to explain in detail what you’re offering, why it makes sense for them to buy it, and the offer you’re making. Making the webinar as high value as possible is the key to success here.
- Start with a landing page (also known as a squeeze page).
- Host your webinar or just say thanks
Depending on whether you decide to go for an immediate sale or take your prospect to a webinar using your funnelbuilder, you’ll follow up the previous page with either a thank you page (assuming they buy) or a page that hosts the webinar itself.
The thank you page would come into play after the webinar if they decide to buy from you there.
Okay, so that’s the very basics, let’s take a look at one of my funnels to help you visualize this, then I’ll run you through it so you see how all the bits fit together.
Good funnel platforms let you visualize funnels like this
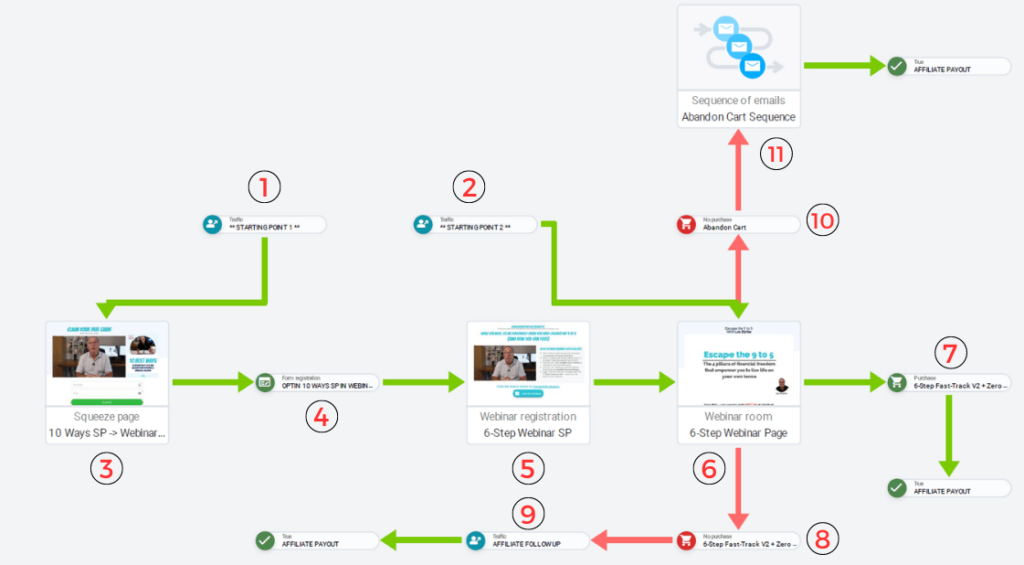
By the numbers, this is what the individual elements of this affiliate funnel designed in my own funnelbuilder for my 6-Step Fast-Track copywriting Program, look like:
- 1. My affiliates can either enter the funnel on my squeeze page (where I give away an eBook for free) or 2. they can send prospects directly to my webinar.
- 3. The squeeze page/landing page itself.
- 4. Prospect email address captured and added to email list (I can then continue to market to them).
- 5. Invitation to my webinar.
- 6. The page hosting the webinar.
- 7. Prospect buys my copywriting course, proceeds to checkout, and the affiliate receives a commission (after a hold period).
- 8. The prospect does not make a purchase.
- 9. The affiliate follows up with their prospect to try to make a sale and generate an affiliate commission (payable after a hold period).
- 10. The prospect gets as far as the cart but abandons the order.
- 11. A simple two-email abandon cart sequence kicks in to give the prospect another chance to complete checkout, hopefully leading to a sale and an affiliate commission generated (paid after a hold period).
Conclusion
As you can see, the visualization process is key in understanding how the parts of the funnel designed in your funnelbuilder work together and it’s the first thing to get in place before starting to build your funnel out.
A funnel alone can 10x your sales because once you’ve captured the prospect’s email address, you can continue to market to them as opposed to them hitting your site once and then disappearing for good.
Combining a sales funnel with an affiliate program is extremely powerful because you can have many people multiplying your sales efforts and can build an (almost) passive income stream if done correctly.
To find out more about the best funnel builder for affiliate marketing (or for your own sales team), check out this article https://lesblythe.com/best-sales-funnel-software
Leave A Comment